Beginning Open Chords
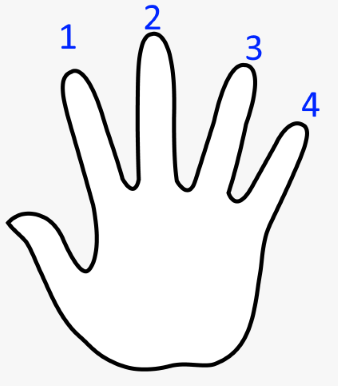
For simplicity, a lot of guitar teachers and guitar sites use numbers to tell you what finger goes where.
The index finger is one, counting to the pinky, which is 4.
This section may seem daunting at first. It contains a lot of information. It contains most of
the open chords that you will use throughout your guitar playing.
How To Use This Tutorial:
This tutorial contains a lot of information. Do not get overwhelmed by it.
WORK AT YOUR OWN PACE!!!!
This tutorial is meant to expand your chord vocabulary.
If you learn all the chords on this page, you should be able to play along with most songs you hear.
DO NOT RUSH THROUGH THESE CHORDS!!!
Learn one chord at a time, and practice it until you can play it cleanly.
Then move onto another chord. After you can play that chord cleanly, practice switching between chords.
As you progress through this page, practice between switching between all chords you know.
As you do this, you may find that switching between 2 chords, may remind you of a song you know.
This is where the hard work begins to become fun!!! And that is what the purpose of learning guitar really is.
When you want to know more and more, the hard work seems worth it.
What is a ROOT NOTE?
A chord is made up of multiple notes, which are played at one time, forming a full sound.
In its simplest form, the lowest note in the chord, it called the root note.
It's where the chord begins, and the notes that come after it determine the type of chord that it is.
So, in any E chord (Major, Minor, etc.), the E is the lowest note, thus it's the root note.
E Major Chord - E
The first chord that most guitar players learn is the E Major Chord.
The reason is that it's fairly easy to finger, and get right.
There are no stretches necessary in this chord.
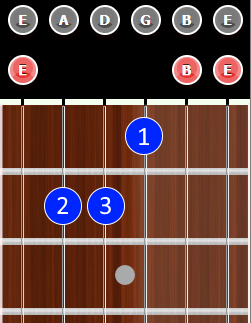
The notes of the E Major Chord are E - G# - B
Notice that it doesn't matter if the notes are played in multiple places
In the open E, the E is played 3 times, the B is played twice, and the G# is played once.
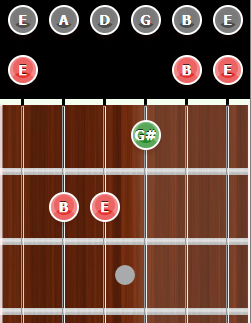
As with any chord, make sure you play it cleanly. Every note of the chord should ring out.
Also make sure to practice picking each note by itself, and make sure they ring out cleanly.
A Minor Chord - Am
The A Minor Chord, may seem like an odd choice for the second chord.
It's our second chord for 2 reasons:
It's a minor chord, so we can see how a Minor chord sounds compared to a Major chord.
Because the fingering is a lot like the E Major Chord.
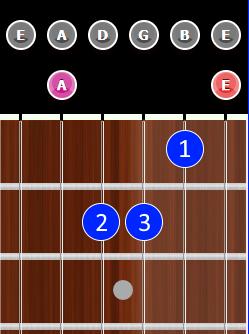
To play an A Minor Chord, simply move the E Major fingering over, one string higher.
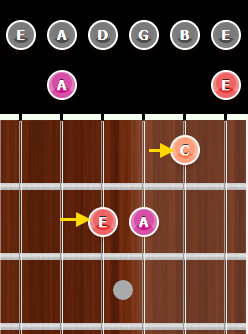
Notice that the Low E string is not played in this chord. So start picking it from the A string. Do not pick the low E.
You might be thinking "I thought you said it doesn't matter how many times a note is played in a chord."
You are correct. But, the root note of the chord matters. So, the root note of an Am chord must be an A note.
If the low E was also played, it would be an "Inversion" of the Am, and change the chord's name.
We will cover inversions later on.
C Major Chord
The next chord we will tackle is the C Major Chord.
Why is the C Major Chord next? Once again, there is a method to my madness.
Here is how the C Major Chord is fretted.
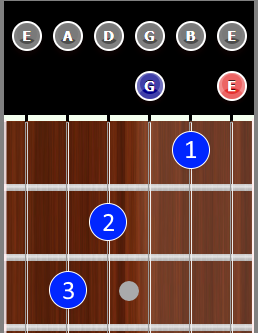
Maybe you already noticed it. But it is similar to the A Minor Chord.
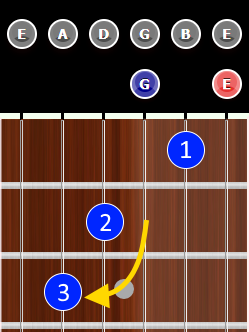
If you fret the Am Chord, you only need to move your ring finger from the G string, to the 3rd fret on the A string.
E Minor Chord - Em
After giving you 3 related chords to get you started, let's fill in some other variants of the ones we already know.
This is the E Minor chord
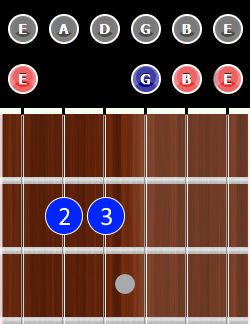
In this fingering, you use the same fingering as the E Major, and lift the index finger. That makes the chord minor.
There is another fingering that is commonly used for the E Minor.
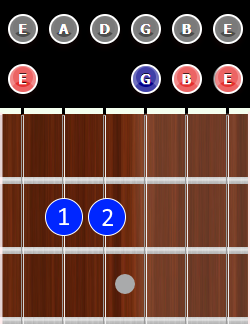
This may seem strange, but extremely rarely will both the E Major and E Minor be in the same passage, or even the same song.
Since you're already use to the E Major fingering, it's perfectly fine to use that fingering.
There are cases where it is easier to use the 1-2 fingering when transitioning to other chords.
I recommend getting comfortable with both. It will most likely help you later on.
A Major Chord - A
Like the E to Em, the A Major chord has one note that is different from the A Minor Chord
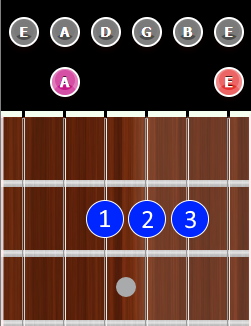
This chord may be a little uncomfortable in the beginning. It will get easier with practice.
Like any other chord, you can use other fingers. Some people fret it with fingers 2-3-4, instead of fingers 1-2-3

G Major Chord - G
Another very common chord is the G Major Chord.
The G has a nice full, open sound. It is probably in a lot of songs that you know and like.
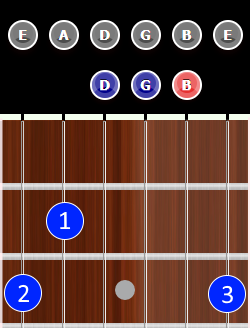
Like other chords, you can finger this differently. Some people use their 2-3-4 fingers, instead of 1-2-3. Of course that is perfectly fine.
The notes of the G (Major) Chord are: G-B-D
Remember what I said about notes can be played more than one time.
If you look at the B string, you might recognize another way to play G.
There is another D on the 3rd fret of the B string. This gives us another way (voicing) to play the G Major Chord.
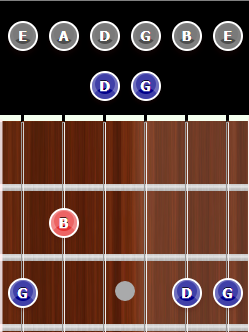
Play both voicings and see which one sounds better to you.
D Major Chord - D
The D Major chord may seem a little cramped at first, but it will become a very comfortable chord over time.
The notes of the D Major chord are: D-F#-A
You fret G and high E strings with your index and middle fingers.
The ring finger goes over the middle finger to fret the B string.
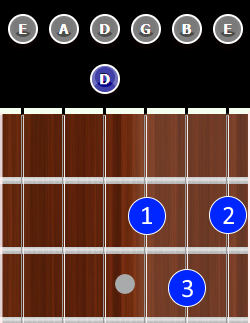
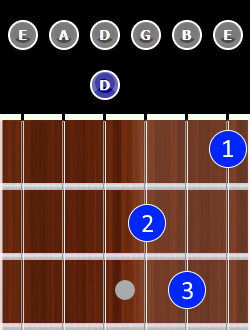
D Minor Chord - Dm
The minor variation of the D chord is a lot less cramped than the major version.
The notes of the D Minor chord are: D-F-A
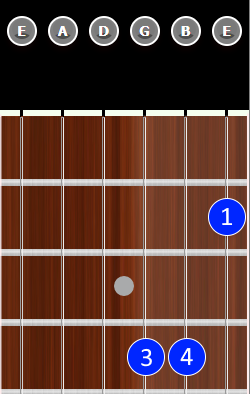
B Major Chord - B
This brings us to partial chords. Partial chords are parts of a larger chord.
Don't worry about that term. It will become very clear when we get to Barre Chords.
The first of these is the B Major chord.
It uses only the 3 highest strings (G, B, and E strings)
The notes of the B Major chord are: B-D#-F#
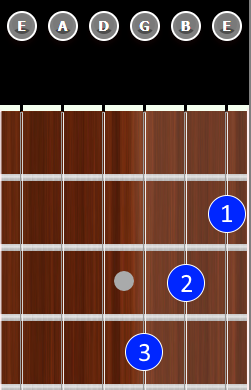
B Minor Chord - Bm
The B Minor Chord is (obviously) the Minor version of the B Chord.
As with the B Major, the Bm uses only the 3 highest strings (G, B, and E strings)
The notes of the B Minor Chord are: B-D-F#
As I stated with the B Major Chord, these are partial chords.
In this variation of the chord, we are adding another F# note on the D string.
If you were around in the 1980's or are familiar with 80's music, you may already be familiar with the Bm sound.
In the Billy Idol song, White Wedding, the main riff is Bm, but it adds an extra note, The F# on the D string.
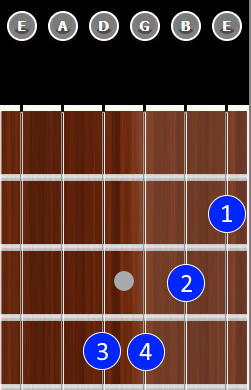
Play this chord, one note at a time, starting with the high note on the E string, so from bottom to top.
Then play the notes back again, from the low F# (D string) to the high F# (high E string)
To finish off the riff, play an E Major Chord.
F Major Chord - F
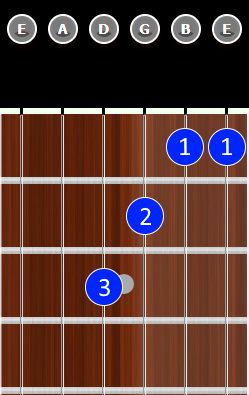
Now comes our first foray into Barre Chords, slightly.
The F Major chord is fretted using the index finger to fret 2 notes on adjacent strings (B and E).
This is done by slightly turning your wrist counterclockwise, so you use the side of the index finger (facing thumb)
This takes some practice to play it cleanly. As long as you slightly turn your wrist,
so you are using part of the side, you will play it cleanly.
NOTE: You DO NOT turn your wrist too much, just a slight turn adds enough support to the finger to fret the bridged notes.
F Minor Chord - Fm
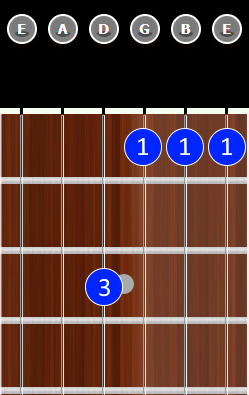
The last open chord in our list is the F Minor Chord. If you were able to master the bar in F Major,
you should have no problem with the F Minor bar. It extends the bar one extra string from the F Chord.
Again, practice the bar, and play it cleanly.
Wrap Up
You should practice each chord until you can play them cleanly.
You should also practice switching from one chord to another.
Practice the transitions between chords both strumming, and also playing each note.
There are many songs that play the same chord patterns.
For example: Em => G => D => A is a very common chord pattern.
A couple of examples are Bryan Adams - Run To You.
also John Mellencamp - R.O.C.K. In The USA, and The Romantics - What I Like About You